Autumn at Ken Lockwood Gorge; #2

Having walked up and down the river bank on Saturday, I realized that even with an overcast sky causing diffusion the sunlight was still angular.  This resulted in fairly flat tonalities within the foliage as seen below, but a noticeable amount of backlighting when looking in the opposite direction.  Both views were prone to photography, but the mood would be very different.

NJ nature photographer

A view up the South Branch of the Raritan River. A line of lichen and moss covered rocks form a natural wall while leaves of yellow, green, and red fill the back of the frame. Taken with the Tamron 14-150mm Di III lens and the Olympus PEN E-PL3 micro four thirds camera.

A 10-stop neutral density was used in the above photo.  Without it, the running water lacked character.

Photo taken with the Tamron 14-150mm Di III lens and the Olympus PEN E-PL3 m43 camera.  Exposure settings: 50s F/9 ISO 200, 31mm

Old Dock and Musconetcong River in Autumn

We are really getting a nice variety of colors in our deciduous trees in Northern New Jersey now.  As much as I’d like to be lazy I know that these opportunities are fleeting, and that an overcast day can really make for beautiful nature captures.

New Jersey Fall Landscape Photo

An old dock twists along the Musconetcong River in New Jersey with a backdrop of Autumn Foliage. Taken with the Tamron SP 24-70mm VC lens and the Canon EOS 6D full frame camera.

The above photo was taken today at the Saxton Falls section of Stephens State Park.  I did try several compositions with this twisted dock including vertical images, but this one “just worked” for me.  Putting the frame of the dock in the center bottom of the image makes a nice leading line into the reflections of the Musconetcong River.

Photo taken with Tamron SP 24-70mm VC lens, a circular polarizing filter, and the tripod-mounted Canon EOS 6D full frame DSLR.  Exposure settings: 2s F/18 ISO 11, 33mm.

Study in Form: Spotted Spreadwing

In the warmer months, I do devote a good amount of my time to photographing Odonates here in New Jersey.  Odonata is the order of carnivorous flying insects including dragonflies and the more slender damselflies.  They come in a great deal of shapes and dazzling colors, making for eye-catching images.  A straightforward but uncluttered capture of a dragonfly or damselfly can have great impact, but occasionally a person may be lucky enough to image their aerial acrobatics or land contortions.

 Lestes congener

A lucky photo of a Spotted Spreadwing damselfly in a greatly flexed position.

A distant background, clear foreground, and attractive perch set the stage for a very minimalistic frame.  The damselfly obliges by pausing for a moment in the shape of the letter “n”.  Looks like it may be ovipositing (attaching eggs)?

Photo taken with the Canon EOS 50D DSLR and the Tamron SP 90mm VC macro lens.  Handheld photo taken at 1/80 F/5 ISO 200.

New Jersey Landscape Photography: View Through Barn

Here is one of my favorite photos I took today on a nature excursion.  The Delaware Water Gap National Recreation Area in NJ contains many historic buildings that are great for photography.  Entrance into the buildings is forbidden, but for this shot I set my tripod just outside of the barn so my lens could peer though.

New Jersey Landscape Photograph

A historic barn divides a view of the woodlands into three sections. Photo taken with the Tamron 14-150mm Di II lens and the Olympus PEN E-PL3 micro four thirds camera.

My favorite part of this photo is the faint splash of light hitting the floorboards in the foreground.

Equipment used: Tamron 14-150mm Di III Lens, polarizing filter, Olympus PEN E-PL3 micro four thirds camera, carbon fiber tripod.  Exposure settings: 1/6 F/11 ISO 200.

Motion Blurs in Photography: How Much is Too Much?

…or how little is too little.  Quite a subjective topic, and of course there are no laws in the arts while “rules” are merely guides.  Having done a lot of nature photography in the past seven-odd years, I generally find that my first impression when proofing my own photos is what appeals most to me aesthetically even in the long run.  Do viewers and peers share my visual preferences?  I’m not sure.  Please do feel free to tell me how you feel about these photos in my comments section.

Today’s subject material ended up being the common Pokeweed plant.  I haven’t done many abstract closeup photos before, so I tried some different camera motions to try to coincide with the shape of the berries and stem.  All photos taken with the Tamron SP 90mm VC F/2.8 1:1 Macro Lens and the Canon EOS 60D, handheld.

#1 – My finalized photo:

NJ Fine Art Abstract Photo

Optimized image with intentional camera movement, ICM.

Settings for above photo: 1/5th F/11 ISO 100.  A slight circular motion of the camera was made.

#2 A split screen comparison of the SOOC shot versus my end product:

photoshop comparison

Lower left is the straight out of camera shot, upper right is what I deemed to have a good amount of contrast for web viewing.

#3 An outtake, not enough motion makes this look sloppy to me

Phytolacca americana

A slow hand movement has rendered a fair amount of sharpness on the subject but still left faint signs of blur.

Above photo settings: 1/5th F/11 ISO 100.  Camera was moved in a slow fashion.

#4 Another outtake.  To me, the subject is unidentifiable and this photo lacks a sense of order:

very blurry view of foliage

Created with a very fast downward motion of the camera as the shutter was closing.

Above photo settings: 1/5th F/11 ISO 100.  Camera was moved in a very quick fashion.

Which do you think looks best?

Rethink the most obvious shooting angle: Green-striped Darners

Photos taken yesterday in Sussex County, New Jersey.  I was actually trying to take a macro shot of a caterpillar in the shade (quite frustrating) when I saw these two large dragonflies in the mating wheel position fly near me and land.  I approached slowly with macro lens in hand and got very lucky that they were not startled off.  Haven photographed insects quite a bit the past few years, it’s only natural to look to capture them both together in the same frame without having any of their appendages extend beyond the frame.

Shot #1:

macro odonata photo

A few of a male and female darner in a typical reproductive pose. Photo taken in Sussex County, New Jersey with the Tamron SP 90mm VC F/2.8 Macro Lens and the Canon EOS 60D DSLR.

Metadata: 90mm, 1/640th F/3.2 ISO 100, handheld with VC.  Manual Exposure.

I NEARLY walked away haven taken a pretty sharp frame, but I thought “what the heck” why not try a true macro photo with high magnification on one dragon’s face.  It took 1 or dozen frames to get a handheld shot in focus at that magnification, but to me it created a photo with a much higher “wow” factor.

Photo #2:

macro odonata face photo

An intimate view of a Green-striped Darner showcasing vivid lateral coloration. Photographed with the Tamron SP 90mm VC Macro Lens + Canon EOS 60D in NJ.

Metadata: 90mm, 1/100 F/5.0 ISO 100, handheld with VC.  Manual Exposure.

It is certainly subjective to which shot is “better”, but the 2nd is more to my liking.  By rethinking about possible compositions I have 2 drastically different photos of the same subject taken a minute or two apart.  Quality nature photography is seldom performed in a hurry.  I have always been an advocate of the phrase “haste makes waste”.

Selective Sharpening in Nature Photography: American Black Bear

My typical nature photo post-processing workflow is very short and sweet unless I have to remove sensor dust spots from shoot at a vary small aperture.  I do like to present my images as realistically and un-manipulated as possible.  My still image format is always camera RAW to get the best possible dynamic range and so that I can make my own decisions over noise reduction and sharpening.  I had the great fortune of finding a wild Black Bear descending a tree in Northern New Jersey today.

Here is my finalized and optimized image with my typical watermarks and downsized at 900px as I generally do for web usage:

ursus american

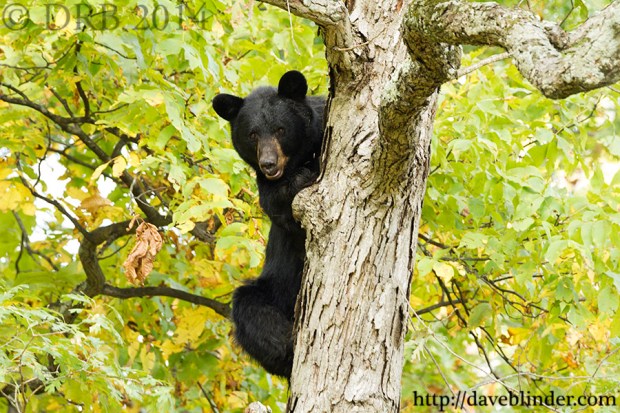
A wild Black Bear descending a tree in North NJ. Photographed with the Tamron SP 150-600mm VC, the Canon EOS 7D, and a Manfrotto tripod.

Taken with a tripod-mounted Tamron SP 150-600mm VC Lens and Canon EOS 7D.  I had no time to prepare for the shot or change my camera settings.  I had previously dialed in ISO 800 F/8.0 +2/3 Exposure Compensation in Aperture Priority Mode, so the shutter speed was to be determined by my camera’s meter.  In this particular shot my 7D did a good job of gauging the brightness and I was left with a shutter speed of 1/80th of a second and a good exposure.  In the world of wildlife though, this is a relatively slow setting and prime for blur of subject movement.

Below are 100% crops to reveal what is really going on behind the scenes in my “digital darkroom”

RAW versus JPEG

On the right is a very unflattering view of my unprocessed RAW at high magnification and on the left is a slightly more flattering view of my output JPEG at the same magnification.

As you can see the eye and fur definition is lacking on the SOOC file on the right.  The Tamron SP 150-600mm VC is very sharp near the 400mm focal length and at apertures like F/8.  Unfortunately AI Servo focus is often less accurate than One-Shot focus.  Other reasons for image softness may include: very slight subject movement, auto-focus sensor slightly off the bear’s eye, shooting in the shade (low contrast on subject), and perhaps the panning movement on my tripod head.

After my initial default global sharpening of the RAW file, I applied an additional low-intensity High-Pass Sharpening layer.  I still was not happy with the definition on the bear’s face.  I created an additional layer of global High-Pass sharpening, but this time I erased the effect off of the background to prevent introduction of widespread digital noise.  I also feathered the remaining sharpening a bit, by tracing the bear’s outline with an eraser tool set to 50% to maintain a natural transition from subject to foreground.  This is one method of performing selective sharpening to optimize images and get the best out of your photos.

Happy to answer any questions about my workflow if you leave them in the comments.

Exposing for backlit photography subjects: Orange Sulphur

I am generally a fan of semi-automatic exposure systems when looking to photograph wildlife.  Specifically, I begin most outings with the camera in Aperture Priority Mode, and having an extra 2/3 stops of lights dialed seems to work pretty often.  However, as soon as I see a tricky lighting situation through my viewfinder I will try to get into Manual Exposure Mode as quickly as possible.

NJ Wildlife Photo

A macro photograph of an Orange Sulphur butterfly in New Jersey. This backlit capture was made using the Tamron SP 90mm VC 1:1 macro lens and the Canon EOS 60D DSLR.

Camera settings: 1/200th F/5.6 ISO 200

Above photo is a handheld capture with one of my typical rigs for closeup photography, the Tamron SP 90mm VC lens and the Canon EOS 60D.  The goal with this backlit photo was to get a good amount of illumination showing on the butterfly itself.  To achieve this, some of the brightest parts of the scene are pushed out of gamut because of the dynamic range restrictions of DSLRs.  As cameras are programmed to expose for the median tonal range of an image, it would require a significant increase in exposure compensation to get what I was after.  Turning the knob to Manual Mode and dialing in my desired settings was a much more succinct process.

“Blowing out the highlights” is not always a sin in my book, as I’ve learned to “see how a camera sees” and envision the end product.  Indeed there is some detail loss on the fringes of the butterfly and also on the petals of the flower, but in this case I think that adds to the “warm” feel of the image.

New Jersey Fine Art Nature Photo: Dusk at the Jersey Shore

This is a recent DSLR image made in Ocean County, New Jersey.  I had seen examples of long exposure photography that exhibited substantial cloud blurring but I hadn’t pulled many off before this.  I still would like to increase the length of this type of shot to minimize shape definition but that will require use of Bulb Mode on the camera and even less light hitting the sensor.

NJ Fine Art Photo

A long exposure DSLR photo facing westward a couple of minutes after sunset. Some low cloud formations briefly reflected vibrant pink and orange hues. Nature photograph taken in New Jersey using the Tamron SP 10-24mm Di II Lens + Canon EOS 50D.

Above photo was taken with the tripod mounted Canon EOS 50D camera and the Tamron SP 10-24mm Di II LD lens.  A Hoya 77mm HDx400 HMC filter is screwed onto my lens thread.  This 9-stop Neutral Density filter greatly lowers the amount of light that reaches the camera’s sensor.  Exposure time is 30 seconds at F/10 ISO 100.  Mirror Lock-Up and Camera Timer were also set on the camera to reduce loss of sharpness from vibration of the camera’s mirror or from my hand pressing the shutter button.

Poplar Leaf on Log

I get very caught up in trying to photograph the wildlife of New Jersey during our summer months.  However, now that the songbirds begin their southern migration out of the Mid-Atlantic and as many insects end their terrestrial lifecycles it is once again time to notice the various and vivid foliage colors brought about by the change of the season.

m43 NJ nature photo

An early Autumn nature photograph from New Jersey using Tamron’s all-in-one lens and an Olympus PEN compact camera.

Above photo was taken with Tamron’s first lens offering for compact Micro Four Thirds digital cameras.  The 14-150mm Di III provides a 28-300mm equivalency (35mm terms).  On the wide end, 28mm is great for drawing in scenery and the telephoto end with a short minimum focusing distance is very useful for honing in on details like individual leaves.  This photo of a Poplar Leaf in New Jersey was taken at focal length of 132mm in Aperture Priority Mode.  -1 stops of light was dialed in, with an aperture of F/9 and the ISO at 200.  My tripod-mounted Olympus PEN E-PL3 was triggered by a 2 second timer to allow for a 1/2 second exposure in this low-light situation.