Optimizing Photo Contrast for the Web: Creek and Fallen Leaves

In my fairly early years of photography, I got caught with the ETTR bug.  Is that a fatal virus?  Nope.  ETTR is an acronym which stands for Expose To The Right.  This ideology is based on the idea that a bright exposure with a histogram pushed as for towards the right (brightness side of histo) is the path to maximum image quality in long run. When exposing to the right, a user wants to make sure the highlights are not clipped or blown out of gamut.  Lost highlights can’t be recovered much, there are no x’s and o’s on your memory card for your camera or computer to look at.  On the flip side, having a slight overexposure of your shadow areas DOES bring in extra information in the pixels.

RAW PhotoShop workflow

A side-by-side comparison of my post-processed file versus the SOOC shot.

The above illustration hopefully shows how I “season to taste” on a landscape photo that I took yesterday.  Setting the black level and white level can be a matter of personal preference, there are no hard-set rules.  I like my pictures to tell a believable tale by retaining the integrity of the scene but I also want plenty of contrast so that my upload or print will “pop”.  For this particular photo I used the Curves tool to bring the dark areas from a medium tonality to a darker tonality.  This provides greater separation between the highlights, midtones, and shadows.  I’ve also added a slight vignette which helped to “burn in” some bright corners from the original photo.

NJ Landscape Photographer

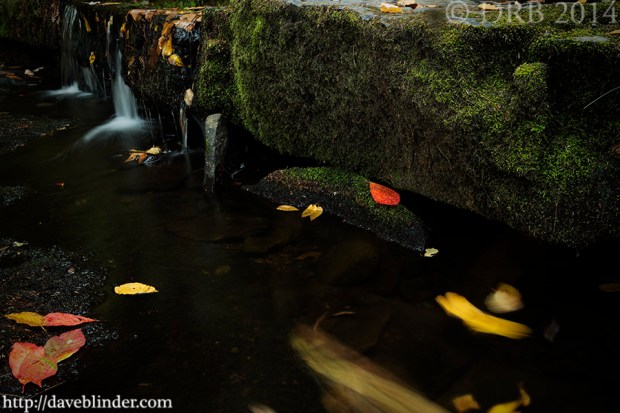
Optimized image, originally exposed to the right. Taken with my Tamron 18-270mm VC Lens and my Canon EOS M 18.0 MP Compact Systems Camera. Manfrotto tripod used for stability and a 3-stop Neutral Density filter was used to lengthen exposure time.

Finalized photo is above.  A landscape nature frame taken in Pennsylvania.  The equipment used includes a Tamron 18-270mm VC Lens, a Canon EOS M Camera, a 3-stop Neutral Density Filter, and a Manfrotto Tripod.  Metadata: 2.5s F/13 ISO 100, 27mm in Manual Mode.

Nature Photography in 20 Frames; my free how-to ebook on DSLR photography

Nature Photography in 20 Frames

Cover for my free short but detailed PDF ebook on Wildlife, Macro, and Landscape Photography. Get your $5 PayPal donation ready… but only if you feel like paying for it 🙂

Press release for upcoming eBook:

Nature Photography in 20 Frames
By Dave Blinder

I’ve completed the content for my first eBook which will be offered in its entirety as a free download, no strings attached, no trojan viruses, etc.  My short illustrated PDF is currently undergoing quality checks and proofreading.  I will provide download locations as soon as possible.  If anyone finds value in the book, I would greatly appreciate a $5 PayPal donation (info included in book) as I have done this work at my own expense.

Within the book I have provided full DSLR settings for each photo shown as well as a grid overlay to demonstrate the composition.  A focus point is also superimposed on each shot to show where critical focus was set.  The nature photos in my book encompass my personal approach to shooting Macro subjects, Landscapes, Birds, and Other Wildlife.

My PDF eBook will be completely free for non-commercial usage and distribution, but may not be altered in any way.  I will offer the eBook via email, my personal website, and try to have it uploaded to popular file sharing services as well.  I will be available to conduct private and public seminars to expand on the subject matter to support my material.

If you’d like personal notification upon release of my eBook send me an email – daveblinder@yahoo.com

Thanks very much,
Dave Blinder
Denville, New Jersey
http://twitter.com/daveblinder
https://daveblinder.wordpress.com
http://flickr.com/davidraymond

Expressing motion in photography: Laughing Gull in flight

Plenty of terms for the type of DSLR photography illustrated in the main image below and to tell you the truth I don’t even know what to call them.  Panning blurs may be the most logical terminology in my opinion.  Anyways, I often forget how much I enjoy looking at this type of capture.  It seems to boil the bird down to its very essence: shapes and colors.

Larus delawarensis

Photo demonstrating intentional use of a slow shutter speed along with panning of a telephoto lens.

Picture taken using a Canon EOS 7D and the Tamron SP 150-600mm VC telephoto lens.  Tripod lens collar is mounted to Manfrotto 055xProB tripod and Manfrotto junior fluid head.  Camera settings: focal length at 600mm, Manually set shutter at 1/30th, aperture at F/14, ISO 100, Camera RAW, Auto White Balance, VC On, Servo Focus Mode, High Speed Motor Drive.  Photography location: Ocean County, New Jersey.  Atlantic Ocean that is…

This type of photo can sometimes be performed in Aperture Priority mode by using a low ISO and large Aperture number to slow down the shutter.  The shutter speeds that usually work best for me are between 1/13th and 1/50th.  Your mileage may vary.  My goal when preparing for this kind of shot is to get a good amount of definition on the wildlife while emphasizing some motion (in this case the wing beats).  I also want a nice bright exposure that will retain a lot of details in the highlights but still have my histogram as far to the right as possible for maximum detail.  Compositionally speaking, I may be looking to place the bird prominently in the frame without cutting off any appendages or I may want try to include some scenery like showing the bird flying across the water’s surface.  There is a great deal of trial and error in this style of photography.  Patience, persistence, and studying other photog’s successful photos will go a long. way.

Butterfly Photography: An American Copper

Several of our local species of butterflies like to rest on whatever flat surface they can find.  I often see butterflies in the middle of dirt trails, dirt roads, and gravel roads.  Probably a nice place to bask for a cold-blooded life form, but not necessarily the ideal scene for a photograph.

Lycaena phlaeas

A closeup view of a small and interestingly marked native butterfly of New Jersey.

DSLR photo of an American Copper butterfly using the Tamron SP 90mm VC 1:1 F/2.8 Macro Lens and the Canon EOS 50 DSLR.  Camera settings in Manual Exposure Mode: Shutter at 1/50th Aperture at F/5.6 and ISO 200.  Autowhite Balance is selected (my typical default), RAW file size, One Shot focusing in Continuous Drive Mode.  VC (in-lens stabilization) On.

This dainty insect is actually sitting on an unattractive dirt trail here, but the camera’s angle of view disguises the surroundings.  To get this view I am lying prone on the ground (a very common posture for good wildlife photographs) and the camera is pressed to my face.  I will often fill the frame as much as possible while trying not to have the subject looked too cramped within the image frame.  I did have to angle the Canon 50D slightly downward to keep the butterfly’s legs in the photo.

Using the “focus and recompose” technique, I pressed the shutter halfway down after initiating autofocus directly on the butterfly’s eye, and then I angled the camera until the lens hood of my macro lens was touching the ground, but the camera body was not.  This low and close-focused perspective has disguised the fact that myself and the butterfly are surrounded by a trail of non-photogenic packed dirt.

What kind of fly are you?

I won’t try to take any credit for getting a fly to land next to this Gray Treefrog metamorph.  I will take credit for being in the right place at the right time and shooting a lot more frames than your average photographer.

dslr macro photography

Chance encounters of the macro type

Photography equipment: Tamron SP 90mm VC F/2.8 1:1 Macro Lens + Canon EOS 50D, handheld.  Shutter speed 1/250 Aperture at F/5.6 ISO 200.  One shot focusing with continuous motor drive active.

Luck was on my side, because the fly got so close to the frog that both of their eyes are in focus.  I actually have a frame where the fly puts one if its feet on the frog’s face, but the whole frame is blurred so that won’t be seeing the light of day.  ….Unless you want to PayPal me $200 🙂

One can never expect unlikely interactions like this to occur, but as Arthur Morris has stated “When unexpected action happens, press the shutter and hope for the best”.  Good advice if you ask me.

Photographing wildlife in harsh lighting: an Eastern Fence Lizard

Below we have a photo of a small, harmless, and downright cute Eastern Fence Lizard.  A native reptile of New Jersey that is widespread within its habitat, but generally not familiar to residents of Northern New Jersey.

Sceloporus undulatus

A closeup photograph of a wild New Jersey reptile taken with a Tamron macro lens and a Canon DSLR.

Photo taken with the Tamron SP 90mm VC F/2.8 Macro Lens and the Canon EOS 7D.  Camera settings: Shutter at 1/100 Aperture at F/3.2 and an ISO speed of 200.  One Shot focus mode, camera handheld, VC On, RAW image format, manual exposure mode, auto white balance.

F/3.2 is not the punchiest aperture of my lens, but it does yield acceptable sharpness.  Shallow depth of field was very important to me in the making of this photo.  My “go to aperture” for macro of F/5.6 brought a lot more detail in the foreground AND the background.  The impact of this photo is in its simplicity and having prominent background shapes and textures strongly detracts from this type of “mid-day silhouette capture”.

Clearly with the sun high in the sky and without cloud cover, the natural illumination of the subject is going to be uneven with a large contrast between the shadows and the highlights.  Many established photographers would call this “bad light” or “problematic light”.  This is not necessarily the easiest condition to create impactful photos in but by manually exposing for the subject’s mid-tones and shooting into an uncluttered background I’ve created a minimalistic photo that evokes thoughts of desert climates.

Butterfly Photography: Sachem Skippers on Boneset

Closeup photos of butterflies make for effective images because these insects are inherently “cute” or “beautiful” to us homo sapiens.  Probably has to do with their harmless nature or being harbingers of warm weather.  An important part of a quality butterfly photo is a clear view of the insect generally with minimal distractions in the nearby foreground and background.  An attractive perch also makes a world of difference.

mating butterflies

A recent butterfly macro photograph taken in Ocean County, New Jersey.

The above image was taken recently at Jakes Branch County Park in New Jersey.  Equipment used: Tamron SP 90mm VC F/2.8 1:1 Macro Lens and a Canon EOS 7D DSLR.  Handheld photo with the lens-based stabilization (VC) turned on.  Camera settings: 1/160 shutter, F/7.1 ISO 200.  More often than not I will shoot butterflies with an aperture of F/5.6 because it is one of the sharpest apertures of my particular macro lens.  With sufficient planing of the camera, this can get a decent amount of depth of field on the subject as well.  In this case, I decided to go with an aperture of F/7.1 to increase my chances of getting the eyes of both Sachems in focus.  Still not an easy task with 2 moving wildlife subjects.

I shot approximately 12 frames very similar to this one, but each time I would angle the camera body very slightly to the left or right and try to get the eyes of both Skippers aligned to my focus point.  When I magnify this particular frame on my computer I can see the detailed cells of the eyes on both butterflies without blur, so for me this is a keeper.

Skateboarding photo from today

I went out with my friend Joe today so that I could challenge myself to some action still and motion footage, his challenge was to land some skateboarding tricks.  There are plenty of variables involved in getting quality extreme sports shots, so I was happy to come home with a few that I liked it.

skateboard trick

Joe popping a skateboard trick off a hip at the skatepark.

Above is a capture of a frontside popshuvit.  I like the frame because you get a nice view of the board in rotation and it’s good some good elevation too!

I was using the Tamron SP 70-200mm VC F/2.8 lens mounted on my Canon EOS 50D.  This combination gives me a fast focusing telephoto lens on a reliable camera with a fast motor drive.  I decided to shoot this frame in a vertical (portrait) orientation, because I think that put more emphasis on the subject in this case.  Other camera settings:  1/1000 shutter with an aperture of F/5.6 and an ISO speed of 200.  I opted for a medium aperture of F/5.6 to get a decent amount of depth of field on Joe but to also provide some separation from the background.  An ISO value of 200 gave me a fast shutter speed, but also provided a nice grain-free image.  The exposure was dialed in manually to give me full control over the ambient lighting.  Tamron’s VC (Vibration Compensation) helped steady the viewfinder for the photo and reduce instances of camera shake.

American Rubyspot damsefly in NJ

This a recent macro insect photo I took in the region of New Jersey known as the Pinelands National Reserve, home to ecosystems and wildlife not often seen in other parts of our state.  Photography equipment utilized: Tamron SP 90mm VC F/2.8 1:1 Macro Lens and the Canon EOS 7D DSLR.  Damselflies are generally smaller than dragonflies, but fall under the same order known as odonata.  Pictured below is a male American Rubyspot damselfly, its Latin name is Hetaerina americana.

NJ insect photo

One of New Jersey’s most vivid damselflies.

I actually ended up wading in standing water that was thigh high to take this photograph.  I saw several Rubyspots perched on vegetation in this pond.  I wasn’t thrilled to get to my cargo shorts soaking wet, but I had to decide to either walk away from a photo opportunity or “dive right into the scene”.

The sunlight was fairly overcast when I snapped this shot so a fast shutter speed was not possible.  Dragging a good tripod into a pond didn’t seem like a good idea, and a tripod is not really an asset when making a still capture of an insect perched on a piece of grass with forces like water ripples and a breeze causing motion.  Handheld and fairly large aperture was the only way this shot was going to happen.

I’ve had a few people tell me that they find a 300mm lens sufficient for shooting small insects, but the reality is you are not going to get this type of highly magnified photo without a 1:1 macro lens.  In this case the fast autofocus and Vibration Compensation were also needed.  Camera settings:  1/125 F/5.0 ISO 400, VC on, Auto White Balance, RAW file format, One Shot focus in continuous drive mode.

American Goldfinch DSLR video; filmed in Cape May, New Jersey

It was a real treat to get some close footage of our vibrant state bird recently.  I knew that I would want footage from several different angles to create diversity… even in a short wildlife video.  Varying the focal lengths and my angle of view on the birds was how I tackled that challenge.

Footage shot in 1080p at 30fps on the Canon EOS 7D with the tripod mounted Tamron SP 150-600mm VC zoom lens.  DSLR was set to the desired shutter speed of 1/60th of a second and I adjusted the aperture and ISO value to get as good of an exposure as possible for each clip.  Unfortunately it was a windy day so I had to strip the audio of the birds interacting and feeding.  I don’t think anyone would have enjoyed listening to the hissing and popping caused by the wind hitting the microphone outdoors.