
Sea Isle Reflections Some tips on night photography camera settings and composition
Sea Isle Reflections
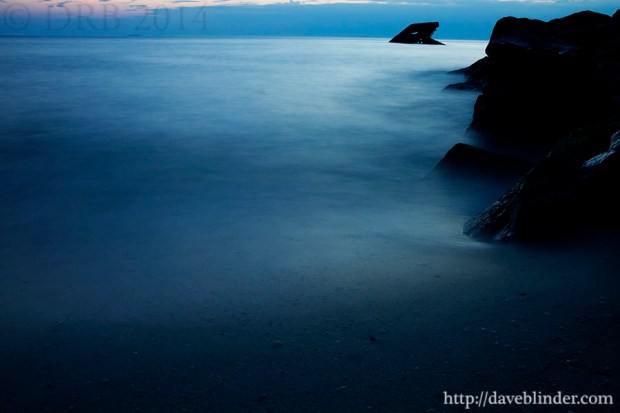
This is an impromptu composition that was dictated by the lighting conditions. My intention for this night photography session was to photograph stars in the sky, but the punchy light from the moon and the promenade limited the definition possible in the sky.

Fine Art Photograph taken at night at the Jersey Shore in Sea Isle City
The camera settings here are a focal length of 18mm, aperture at F/5.6 and ISO speed of 400. Increasing the exposure would have blown out the highlights and decreasing the exposure would have rendered the scene too dark for my tastes. I originally started off at a higher ISO but the image looked washed out so I lowered it a full ISO stop. I do not shoot still photos in incremental ISO’s as anything other than native ISO values can deteriorate dynamic range or image quality. Other settings: RAW file format, Auto White Balance, Mirror Lock Up, 2 Second Timer, VC (stabilization) off, tripod firmly in the sand
The composition in this photo is a pretty straight-forward rule-of-thirds setup. The horizon is placed about 1/3 of the way down from the top of the frame and the houses occupy approximately 2/3 of the horizontal length of the frame. Putting those elements dead center in the photo would have killed the dynamics in my opinion.
American Goldfinch DSLR video; filmed in Cape May, New Jersey
It was a real treat to get some close footage of our vibrant state bird recently. I knew that I would want footage from several different angles to create diversity… even in a short wildlife video. Varying the focal lengths and my angle of view on the birds was how I tackled that challenge.
Footage shot in 1080p at 30fps on the Canon EOS 7D with the tripod mounted Tamron SP 150-600mm VC zoom lens. DSLR was set to the desired shutter speed of 1/60th of a second and I adjusted the aperture and ISO value to get as good of an exposure as possible for each clip. Unfortunately it was a windy day so I had to strip the audio of the birds interacting and feeding. I don’t think anyone would have enjoyed listening to the hissing and popping caused by the wind hitting the microphone outdoors.
Dusk at Sunset Beach
I was doing nature photography in various parts of Cape May this past Thursday, and had a gameplan to head to the well-known Sunset Beach area to try to make some photos of the setting sun. My plan was foiled as the horizon clouded over as the sun began descending closer and closer to the horizon.
A recent long exposure photo taken in Cape May, New Jersey.
With a fairly bleak sky I shifted my attention and tripod-mounted camera downwards to try to capture the water motion near the tideline. For this capture, I have a circular 3-stop Neutral Density filter attached to my Tamron 18-270mm VC lens to allow more time for motion within the frame. The resultant exposure time here was 30 seconds with an aperture of F/13 to have an expansive depth of field. The ISO value of 100 provides the best image quality possible on current DSLR cameras.
The composition in this image incorporates the rule of thirds to draw the viewer in. The dark rocks of the jetty occupy roughly 1/3 of the horizontal width of the frame and the sky occupies approximately 1/6 of the vertical height of the frame. The misty water occupies the vast majority of the scene, but the rocks and the sky give a sense of scale and environment to the scene.
…
Fingers and Fretboard
A short guitar video (of myself) that I recorded and edited recently in New Jersey.
Manually prefocusing two cameras on the position my guitar would be at was a challenge in itself. I actually took a cardboard box from a photography light stand and laid it in place as a marker for focusing. Took me about 3 tries to really guess exactly where my Ibanez guitar would be. I had external microphones from both cameras wired fairly close to where my small guitar amplifier was on the ground.
After setting the manual video exposures on both cameras, I started rolling and slid myself into position. Took me about 7 minutes on this take to get a 45 second musical passage that I was happy enough with.
Video post-processing first involved syncing the full 7 minute clips by matching peaks on the audio waveforms. After that, it was a matter of cutting to whichever video feed I wanted to be viewed for the guitar part being played. I did some color corrections, highlight tweaks, and selective saturation before rendering out the AVI file.
..
Mic Check
My first test of the Olympus EMA-1 External Mic Adapter + Olympus ME51S Electret Condenser Microphone. No audio post-processing performed. Filmed in manual video mode on an Olympus E-PL2 micro four thirds camera through the Tamron SP Di 90mm Macro lens adapted with a Fotasy Canon EOS to m4/3 coupler.
Here’s a view of the Olympus microphone along with the lens and camera I used to for the video and audio recording.
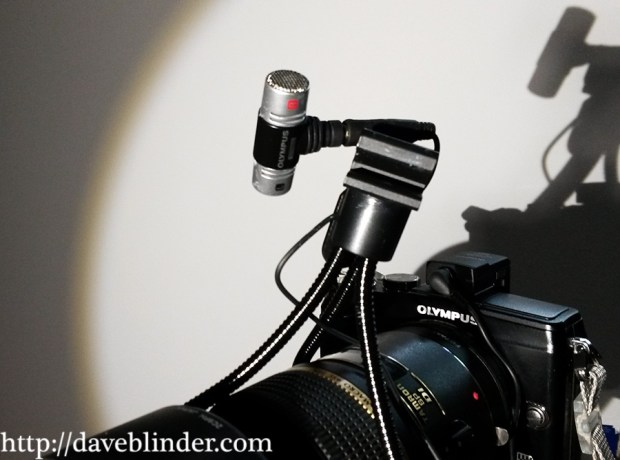
Olympus EMA-1 External Mic Adapter + Olympus ME51S Electret Condenser Microphone. Tamron SP Di 90mm F/2.8 Macro Lens + Olympus PEN E-PL2 micro four thirds camera.
Just another Macro Monday
Sometimes when I head outside to do nature photography, a few nice shots quickly present themselves to me. Other times, I am outside for hours and the subjects are not cooperating or I just can’t find anything that catches my eye. 3 hours had gone by after lugging around 2 cameras in a local meadow today and it looked like it was time to throw in the towel. Low and behold, a charismatic insect in a charismatic setting was found while returning to my car.

Asian Lady Beetle atop a white blossom (probably Queen Anne’s Lace).
The above photo was taken with the Tamron SP 90mm VC Macro Lens and a Canon EOS 7D. It is generally my preference to shoot from a tripod but when your subject is blowing from a breeze I find that a tripod can actually become an obstacle to getting the capture. The sky had clouded over at this point in the day so I switched the exposure to full manual controls to ensure a proper bright image. At ISO 400, which I consider my upper threshold for daytime macro shooting, I was still limited to a low shutter speed.
Choosing a fairly large aperture of F/3.2 allowed more light to hit the camera’s sensor and provided a “dreamy” rendition of the white blossoms. Composition-wise I thought that executing a vertical photo would create a more dynamic picture and the Beetle is in pretty good compliance with the Rule of Thirds. I did have to shoot at least a dozen frames with the VC (Vibration Compensation) on. 1/100 of a second is not a very fast shutter speed to freeze a small fragile plant swaying in the breeze and increasing the ISO would degrade the image quality too much for my liking. Nature photography does take a good deal of tenacity and perseverance in my opinion, but a few sharp shots a day keeps the grumpy Dave’s away.
Image Optimization: Before and After
“Get it right in the camera”! This is a common and sagacious phrase in the photography realm, and one which I abide by. Typically my nature photos are ready for print or the web within 2 minutes after I’ve imported them from my memory card. With on-the-scene portraiture there are a lot more variables, so spending a little more time in the “digital darkroom” to polish up the photo is commonplace. You will note, however, that the exposure on the artist (Rostafa) is identical aside from a contrast tweak. The foundation for a quality capture here is in quality flashwork and a backdrop of the proper color.
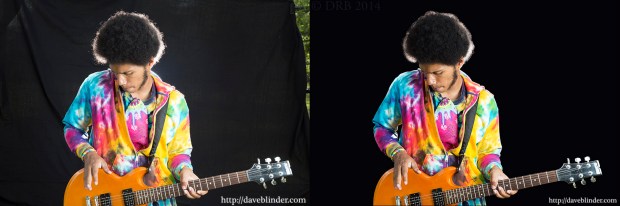
Straight out of camera (RAW file) and finalized output JPEG
My first (and longest) step in post-production was taking the Pen Tool and manually selecting the artist himself. Carefully creating a path around the subject while viewing the image at 100% magnification for precision. This is not fun, but absolutely necessary. Once the path is created by the Pen Tool, I then choose the option “Convert Path to Selection” which makes the subject highlighted. I then go to the selection menu in PhotoShop and choose “Invert Selection”, which means that my background is completely selected while Rostafa is not. Now I hit the “bucket tool” and fill in the background with solid black so we have gone from a slightly grayed out backdrop and have the desired black. This is going to make our subject “pop” more and right away we’ve gone from an amateur-appearing capture to a professional grade image. We are not done yet though. I resume looking at the contours of the subject at 100% and will paint or “burn” any edges that look too jagged so that he looks like does indeed belong on this backdrop.
The rest of the workflow is very straightforward. But if you have any questions, feel free to leave them in the comments and I will answer.
Photography Equipment:
Tamron SP 24-70mm VC F/2.8 lens
Canon EOS 6D
Canon Speedlite 430exII in softbox on camera right for main light.
Canon Speedlite 580ex behind subject for backlight.
Yongnuo YN622 wireless transceivers x 3
Portable backdrop stand.
Getting even closer: Tamron’s new 14-150mm “all-in-one” zoom lens
Getting even closer: Tamron’s new 14-150mm “all-in-one” zoom lens
I’ve been enjoying the very useful range of Tamron’s new lens (their first release for the micro four-thirds format). With a compact sensor size, the effective focal range is 28-300mm, which covers a great deal of ground for all-around nature photography.

Olympus PEN E-PL2 micro-four thirds camera, Tamron 14-150mm all-in-one zoom lens, Meike P-AF3B extension tubes, Olympus MAL-1 macro lights.
I had found an $23.50 eBay open box special for extension tubes that would mount to my Olympus PEN E-PL2 body (or any m4/3 body for that matter). The Meike Macro DG Extension Tube Set MK-P-AF3B fits between my PEN camera and any lens with the 4/3 mount whilst retaining full control of autofocus and aperture controls. I believe the Meike brand is an import and re-branded as Neewer when sold directly in the USA.
As you can see in my above Instagram photo, along with the extension tubes and Tamron’s 14-150mm lens, I also have Olympus’s MAL-1 flexible macro light arms mounted for the ability to illuminate subjects very close to the lens.

This photo will give you a better idea of the size of the small frog I was photographing.
Below is an uncropped resultant photo from my PEN camera of the juvenile Wood Frog (Lithobates sylvaticus). By adding extension tubes to an already close-focusing and high quality lens I now have the ability to fill the frame with subjects not much bigger than a Lego.

A young diminutive amphibian of damp forests.
