
“Get it right in the camera”! This is a common and sagacious phrase in the photography realm, and one which I abide by. Typically my nature photos are ready for print or the web within 2 minutes after I’ve imported them from my memory card. With on-the-scene portraiture there are a lot more variables, so spending a little more time in the “digital darkroom” to polish up the photo is commonplace. You will note, however, that the exposure on the artist (Rostafa) is identical aside from a contrast tweak. The foundation for a quality capture here is in quality flashwork and a backdrop of the proper color.
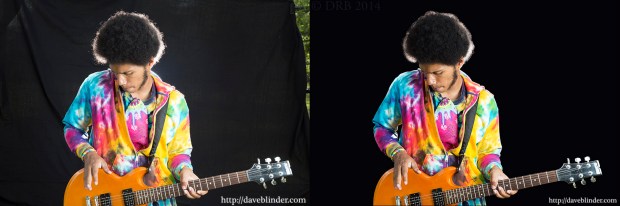
Straight out of camera (RAW file) and finalized output JPEG
My first (and longest) step in post-production was taking the Pen Tool and manually selecting the artist himself. Carefully creating a path around the subject while viewing the image at 100% magnification for precision. This is not fun, but absolutely necessary. Once the path is created by the Pen Tool, I then choose the option “Convert Path to Selection” which makes the subject highlighted. I then go to the selection menu in PhotoShop and choose “Invert Selection”, which means that my background is completely selected while Rostafa is not. Now I hit the “bucket tool” and fill in the background with solid black so we have gone from a slightly grayed out backdrop and have the desired black. This is going to make our subject “pop” more and right away we’ve gone from an amateur-appearing capture to a professional grade image. We are not done yet though. I resume looking at the contours of the subject at 100% and will paint or “burn” any edges that look too jagged so that he looks like does indeed belong on this backdrop.
The rest of the workflow is very straightforward. But if you have any questions, feel free to leave them in the comments and I will answer.
Photography Equipment:
Tamron SP 24-70mm VC F/2.8 lens
Canon EOS 6D
Canon Speedlite 430exII in softbox on camera right for main light.
Canon Speedlite 580ex behind subject for backlight.
Yongnuo YN622 wireless transceivers x 3
Portable backdrop stand.

Pingback: Image Optimization: Before and After | daveblinder