New Jersey Nature Photo: Bridge and Falls in Winter

Today was the first time I stumbled on this small waterfront park in downtown Belvidere, New Jersey.  Light clouds allowed for a decent amount of natural diffusion, so all I had to do was put my tripod into a logical spot and press some buttons!

For scenes with running water, angling the camera downwards often works best.  It exaggerates foreground elements and minimizes the impact of the sky.  I am doing a good amount of winter photography around mid-day, provided the light is not harsh.  Calling a typical mid-day sky in New Jersey dull would be an understatement.  No reason to have dull elements in the photo, so leaving just a sliver of the sky in photos still provides contextual clues to the actual scene.

NJ Nature Photography

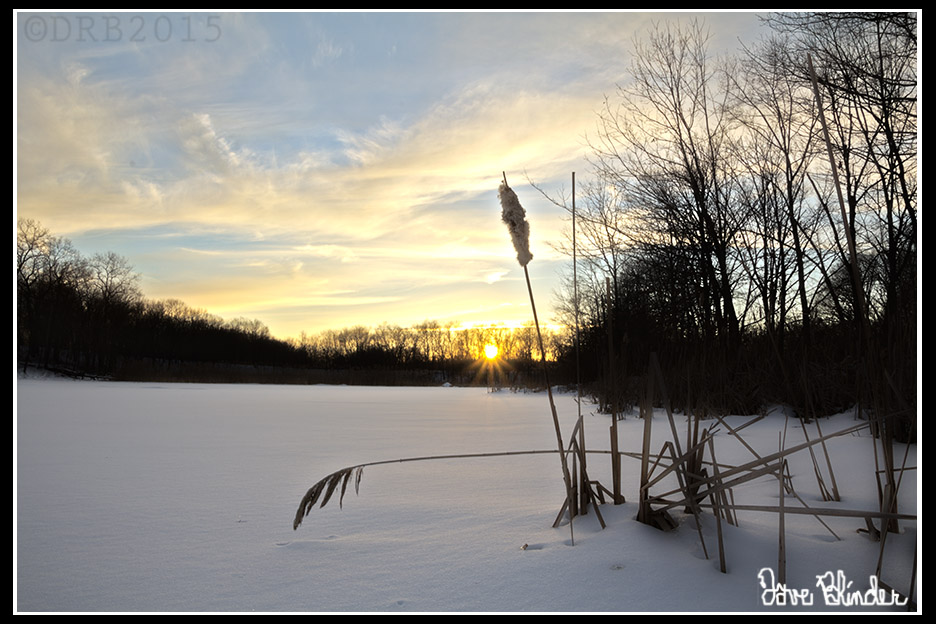
A landscape photo taken today in #NJ. The #Tamron 16-300mm VC PZD #lens can offer a very nice wide perspective on a scene like this. I carefully positioned my tripod to prevent too many elements from merging with the corners of the photo frame.

Image retouching – Background Repair

Here is a “background repair” retouch that I did this morning on one of my own photographs.  Looks like an unsightly out of focus branch needed to be fixed here.  Luckily, out of focus areas not intersecting anything of importance can be quick fixes.  In the central pane you can see that I duplicated a section of the clean background and roughly aligned it into position.  On the rightmost frame I have used a few blur techniques to blend the new with the old.

It’d be a shame to let a sharp photograph of a Common Yellowthroat go to waste!

Retouching questions or services needed?  Just ask!

Photoshop Retouching Background

A view of the progression of some photo #restoration and #optimization. Performed in #Photoshop.

New Jersey Nature Photography: Sunset over Frozen Pond

This afternoon I ventured out in the cold, dangerous, and remote tundra…. Okay okay, so I was actually only a few minutes from the big local shopping mall in New Jersey.  Anyhow, I was scouting the location as the sun slowly descended towards the horizon.  A photographic frame came together in my mind as I walked across a small frozen pond.  Why was I walking on the pond in the first place?   Bodies of water often offer a clean and uncluttered midground for scenic photos and quite often rocks or vegetation on the periphery can be used very effectively to anchor the foreground of an image.

Below I have uploaded my final output jpeg, compromised of a 3 exposure HDR blend.  Below that is a view of what the individual exposures looked like.  Last is a snapshot of my Canon T5 DSLR and Tamron 16-300mm VC PZD lens in position for the capture.

New Jersey Photograph of a Winter Sunset

Sun beams pierce the wooded fringe of a calm pond on a cold February evening. This is a three image #HDR blend and the #photos were taken with the #Tamron 16-300mm VC PZD lens and the Canon EOS T5 DSLR.

raw image previews

A quick look at my three unprocessed #raw exposures. The #dynamic range of the #Canon T5 sensor is approximately 12 stops of light, which is not quite enough to record details in the highlights and the shadows of the scene.

BTS nature photograph

A peek behind the scenes, my #DSLR is atop my tripod and positioned very close to the ground. The petal shaped #lens hood of the #Tamron 16-300mm VC PZD can greatly help reduce flare from shooting into the sun.

How to take bad photographs

How to take bad photographs:

crappy nature pic

A really #bad #nature #photograph of the poorest digital quality. I took it.

1) Use poor technique.  Why strain yourself and shoot from awkward angles when you can just get out of your car, and shoot from eye level???

2) Pay no attention to how bright the sun is… PhotoShop can fix it all!!

3) Just copy what everyone else is doing.  Since when are creative arts about being creative?

4) Buy the most expensive camera, lens, and flash.  MAKE SURE to tell everyone you are using the most expensive gear.  There’s no reason to read books or take lessons when you’ve “got the goods”.

5) Spend as much time as possible criticizing others’ photos.  Don’t worry what yours look like!

6) Make a ridiculously unprofessional “branding” for your photography, maybe try “Uncle Joe-Bob’s Mind-blowing Captures”?

7) Build a network of others who also aspire to mediocrity!

In conclusion, I hope this helps you successfully take bad photographs.  Please let me know if you find this helpful.

Nature Photography – Organizing the Chaos

A typical nature scene, especially woodlands and meadows include a lot of visual clutter and overlap when seen from the typical human angle of view.  When we press the camera’s shutter button from that perspective, everything is permanently recorded into our digital image.  We are frequently disappointed when the photo “doesn’t look like what we saw”.  Plenty of studies have been done on comparing human perception to a camera’s imaging system.  Moral of the story is that we focus differently and our optical systems have different dynamic ranges than cameras currently in existence.

How to compensate for the ever all-seeing camera lens?  “Organize the chaos.”  A well known phrase to experienced photographers.  How to organize?  One of the many techniques is to seek symmetry in nature photography.  Absolute symmetry is rarely going to present itself, but we will still seek it…

In my photo below I’ve aligned my angle of view to have two nearly parallel trees create a natural rectangle (or is that a rhombus?) around the sun.

New Jersey nature photography

New Jersey nature photo of an overcast sky as framed by two large trees and their gnarled branches. Handheld capture from the #Tamron 16-300mm VC PZD lens and #Canon EOS T5 #DSLR

Photo Editing: Adding a digital neutral density filter

I made my way to Orange County, New York today to shoot some of the more rustic areas following the scenic snow our area accumulated.  When I am doing landscape photography, my goal (aka everyone’s goal) is to capture as much dynamic range as possible in the raw file.  This is accomplished by ETTR (exposing to the right), and getting the brightness histogram as far right as possible without blowing the highlights out of the gamut.

The raw file will always be lacking in contrast before post-processing, but generally a global Curves Adjustment Layer will do the trick for me.  As we can see below, there is a bit of cloud detail in the sky in my original shot, but in general it does appear featureless.  Featureless sky = boring photo.  To give the sky a little pop, I added a new blank layer in the digital darkroom, and simply did a directional fill with the gradient tool (black to transparent).  I also changed the layer blending mode to “overlay”.  Results below.

Mostly unprocessed view, note that I adjusted the horizon and had to “add canvas” after a slight rotation.

NYS scenery photo

Not a great finished product, but it is a start. #Composition mostly adheres the the rule of thirds, and I positioned my #camera to have weeds fill in some negative space in the snowy foreground.

My finalized jpeg for web view.  Digital ND filter superimposed over sky, and foreground repaired after slight rotation.

NYS Winter Fine Art Photo

#NYS Winter scenery photo. Taken handheld with the #Tamron 16-300mm VC PZD lens and the #Canon EOS T5 #DSLR

Another successful outing with the new Tamron All-In-One lens.

Tamron 14-150mm + Olympus PEN E-PL2 sharpness

Since having my Olympus PEN converted to infrared (IR + UV spectrum to be precise), I’ve noticed a really great amount of sharpness in my photos.  The Tamron 14-150mm Di III lens natively takes very nice photos, and I also believe that IR photos may have greater clarity than our typical visible light spectrum.  Below is a 200% crop of a nature photo I took today with the Tamron 14-150mm Di III, infrared-converted PEN E-PL2, and my Benro carbon fiber tripod.  No filter on the lens.

Infrared photo detail

Photo taken with #Tamron 14-150mm Di III lens and #infrared converted #Olympus PEN E-PL2 micro four thirds camera.

Below is a view of my full-sized web photo:

NJ Fine Art Photo

A #monotone image captured with the #Tamron 14-150mm Di III and infrared converted #Olympus PEN E-PL2 micro four thirds camera.

Exposure notes – 150mm (300mm in 35mm terms), F/9.0, 0.6s, tripod, manual white balance (kelvin).

The effects of a circular polarizing filter on a superzoom lens

I’d been recently caught off guard by the lack of sharpness on the long end of my 16-300mm VC lens so I performed a brief test with and without my frequently used 67mm circular polarizing filter. The drop off in sharpness is completely the fault of the filter. At 16mm with my polarizing filter mounted I do get a very sharp image, but at 300mm with the polarizing filter the photos become very hazy. There is no noticeable loss of sharpness from wide to telephoto end without the filter.  The filter used is a 67mm slim Zomei filter.

Remember to always conduct sharpness tests on lenses without filters, and if you want to test the sharpness of the filters themselves you must do so in controlled exposures.

*Note that none of these photos are intended to be flattering shots, these are uncorrected jpegs in harsh backlighting.

Sharpness check with filter

Upper left – 16mm F/8 ISO 100, no filter. Upper right – 16mm F/8 ISO 100, slim 67mm CPL filter. Lower left – 300mm F/8 ISO 100, no filter. Lower right – 300mm F/8 ISO 100, slim 67mm CPL filter.

HDR Post-processing: Pond in Winter

I’ve been using the auto-bracket feature on my Canon EOS T5 Rebel a bit lately.  I believe some cameras allow you to take up to 5 bracketed shots with the push of a button, but the T5 is limited to 3 shots.  The intervals of the related under and over exposed shots are however, customizable.  I normally distance each photo by about 2/3 stops of light.  While still regularly checking the histogram on my LCD, the bracketing feature is particularly helpful for daily landscape photography, where highlight areas are easily clipped.

Below is an HDR image created from one such bracket of exposures.  I left most of the HDR sliders in default positions and this created a fairly natural looking jpeg.  I could be imagining things, but I still think I see slight halos on the trees in the horizon though…. For further comparison I’ve included a split screen comparison with my single best frame against the HDR output.  This makes it easier to see how detail was gained in both the sky and foreground.

HDR Landscape Photo

3 bracketed raw files are merged together for a winter landscape photo in #NewJersey. Photo taken with the #Tamron 16-300mm VC lens and the #Canon EOS T5.

Natural looking HDR photo

Left side of image is from processing a single #raw #photo as best I could. Right side is from an automated #HDR processing of three raws.

Florida Travel Photography: Spanish Moss Detail

Below is a handheld capture of Spanish moss using the Tamron SP 90mm VC macro lens.  By getting in very tight on the subject, a large visual emphasis is placed on the individual curls of the plant itself.  We as viewers can also see a bit of surface detail on the moss, a characteristic I was previously unfamiliar with.  To balance out the composition of this macro frame, there is an intentional inclusion of negative space.  Negative space equates to a nice out of focus background here.  As always the photographer needs to make educated decisions about what to include and what not to include in the frame.

Florida Macro Photography

An intimate view of a strand of Spanish Moss exposes naturally formed spirals. #Florida #travel photo taken handheld with the #Tamron SP 90mm VC macro lens and the Canon EOS T5 DSLR.