
Getting even closer: Tamron’s new 14-150mm “all-in-one” zoom lens.
Category Archives: Uncategorized
Getting even closer: Tamron’s new 14-150mm “all-in-one” zoom lens
I’ve been enjoying the very useful range of Tamron’s new lens (their first release for the micro four-thirds format). With a compact sensor size, the effective focal range is 28-300mm, which covers a great deal of ground for all-around nature photography.

Olympus PEN E-PL2 micro-four thirds camera, Tamron 14-150mm all-in-one zoom lens, Meike P-AF3B extension tubes, Olympus MAL-1 macro lights.
I had found an $23.50 eBay open box special for extension tubes that would mount to my Olympus PEN E-PL2 body (or any m4/3 body for that matter). The Meike Macro DG Extension Tube Set MK-P-AF3B fits between my PEN camera and any lens with the 4/3 mount whilst retaining full control of autofocus and aperture controls. I believe the Meike brand is an import and re-branded as Neewer when sold directly in the USA.
As you can see in my above Instagram photo, along with the extension tubes and Tamron’s 14-150mm lens, I also have Olympus’s MAL-1 flexible macro light arms mounted for the ability to illuminate subjects very close to the lens.

This photo will give you a better idea of the size of the small frog I was photographing.
Below is an uncropped resultant photo from my PEN camera of the juvenile Wood Frog (Lithobates sylvaticus). By adding extension tubes to an already close-focusing and high quality lens I now have the ability to fill the frame with subjects not much bigger than a Lego.

A young diminutive amphibian of damp forests.
The Making of a Photo: Banded Hairstreak
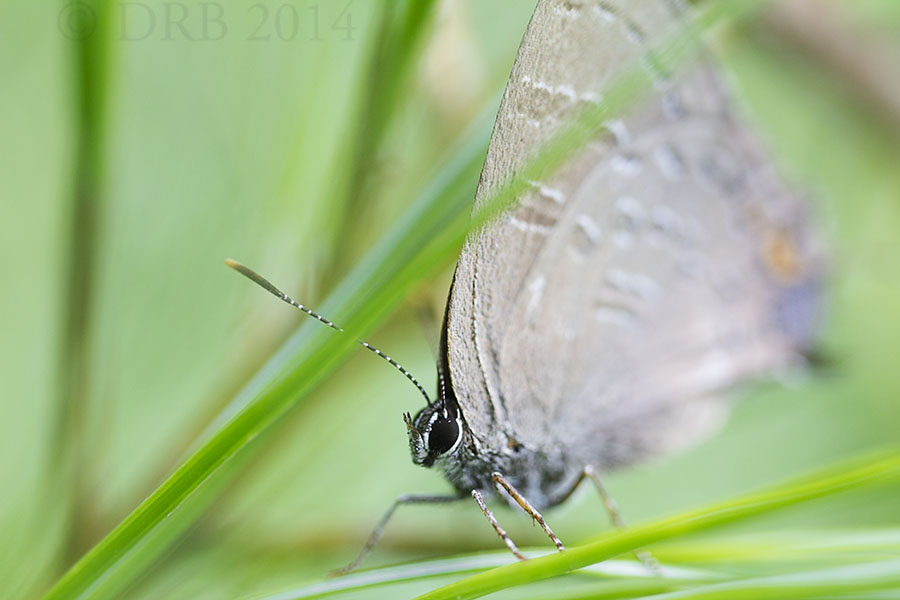
A small Banded Hairstreak Butterfly hiding in a conifer.
90mm, VC ON, handheld, ISO 400, 1/100 F/3.2
Long time, no post!
I thought some people might be interested in my thought process on this somewhat unconventional macro photograph. This is a handheld shot with one of my basic setups, the Tamron SP 90mm VC F/2.8 lens and my Canon EOS 60D. Initially, this small butterfly was nectaring on a good-looking flower out in the open, which seemed like an opportune moment to snap some shots. Upon my approach, it flew into this small coniferous tree and remained there for quite a while.
The two most common approaches I take when photographing a butterfly are a profiling photo (ventral view) or a top-down view (dorsal view). When photographing a winged insect in either one of these manners, it often emphasizes the colors and patterns throughout the wings. Not necessarily easy shots to take when trying to fill the frame with a tiny flighty critter.
Obviously, in my Banded Hairstreak photo at the top of this page, neither of these angles are really possible. For me, situational photography is often a matter of problem-solving, like a rubik’s cube of sorts. I recognized the situation to make what I would call a “hiding” or “peak-a-boo” shot”. I decided I would limit the depth-of-field so that the green needles would have a soft and melty feel. I also wanted to get the butterfly’s face as close to the camera as possible for subject emphasis. Handholding a DSLR in a lowlight situation and dealing with wind to get critical focus near 1:1 magnification is also a challenge. Out of about 30 frames of this exact shot, I walked away with 1 photo that I felt was sharp enough.
Artistic Panning Blur versus Static Detailed Photograph

Above is a composite of two photographs I took yesterday, here in New Jersey. This shows two distinctly different ways to photograph the same subject matter at the same focal length. Both were taken with a Tamron 90mm VC lens and a Canon EOS 7D.
The technique employed on the left is called by several different names: Intentional Camera Movement (ICM), Pleasing Motion Blur, Panning Blur, Painting with Your Camera… and so on. What were the camera settings and how was this executed? I generally always shoot in manual mode on my DSLR when trying Panning Blurs. I try to create a very bright camera RAW file with maximum detail in the white channel, without blowing too many highlights. I think I a goal aperture of F/11 is a good idea to capture a good amount of detail but minimize diffraction or the chance of sensor dust spots rearing their ugly head. An ideal shutter speed of 1/20th of a second to about 1 full second usually works for me. A slow shutter speed like this usually means an ISO setting of 100 and shooting in the shade or on an overcast day. If the sun is too bright to get detail at those settings you may need a polarizing filter or neutral density filter to cut out a few stops of light.
Having an anti-shake mechanism on the lens or camera is helpful to steady the viewfinder and get smoother horizontal or vertical lines. In this case, Tamron’s 4-stop Vibration Control was set in the ON position, and the results of the VC along with a fluid handheld panning motion lead to straight horizontal lines within in the photograph. I did manually pre-focus my macro lens for this photo, although “One Shot” autofocus mode as Canon calls their stationary shooting mode would have worked as well. This particular subject matter worked well with a horizontal panning motion because of the preexisting horizontal lines in the subject (a simple common chunk of rock outdoors).
When and why might you want to try this technique? There are many reasons to do this:
1) It’s fun and very akin to using a paintbrush
2) Expand your nature photography portfolio
3) This is a great way to create Fine Art of a subdued, impressionistic, and thought-provoking nature
4) Why not? 🙂
As with all non-conventional photography techniques I would advise you to add as many tricks to your arsenal as possible, but don’t allow your style to be pigeon-holed or cliched. Versatility is king when you are swimming in a sea with many fish.
Wildlife Filming Equipment

Tamron 150-600mm VC Telephoto Lens
Canon EOS 60D
Rode VideoMic GO microphone (just purchased from Unique Photo in Fairfield NJ)
Equipment used for shot:
Canon EOS 7D DSLR Camera.
Tamron 90mm VC Macro Lens.
Cowboy Studio Fluorescent Light + Window Light
NJAS – All Things Birds: Glacial Lake Passaic
I intercepted my friend Mike leading a local trip for New Jersey Audubon Society in search of newly arrived Spring birds and potential Winter lingerers in Morris and Essex Counties today.
Photography equipment used includes my Tamron 18-270mm VC Lens, Tamron 90mm VC Macro Lens, Tamron 150-600mm VC Telephoto Lens, Canon DSLR’s, Canon Speedlite 270exII flash, and my Manfrotto 055xProB Tripod with 498rc2 Ballhead.
Wildlife sighting highlights for the group today: American Kestrel, Rusty Blackbird, American Mink, and several Shrews.

Looking for Sparrows and Blackbirds in the tall vegetation

Scanning for songbirds

Random object along the trail

A fairly large sized Northern Brown Snake found basking on the road.

Old remnants of a Two-pointed White-tailed Buck

A typically long and slender Ribbon Snake found along the trail

Close-up detail view of an adult Snapping Turtle

Many Sweetgum trees in the area.

Yellow Buttercup wildflower seen near forest entrance.

Blooms seen on mature trees lining the meadow

An old lifeless tree in front of a wall of Phragmites.

The birding group takes a break to discuss the habitat.

The trees that dot the meadow are starting to show their Spring coloration.

Trees showing their fresh green on a warm Spring day.

Typical plant life in a flooded section of the forest
Macro flash and video LED setup

Canon 7D + Tamron 180mm SP Macro lens. A straight flash bracket is attached to the camera body, my Canon Speedlite 270exII is mounted on top of a Giottos mini ballhead. The Speedlite head is covered by my homemade diffuser (actually a plastic coffee “tin”), and today I glued a cold shoe mount on top of the diffuser to mount a Manfrotto ML120 Pocket-12 LED Light for shooting macro videos at night.
Photography with Intent

I did originally compose this shot (tripod mounted camera of course) putting the thick central line (gap in my exterior car panel) off-center as I find the compositional Rule of Thirds very effective. However, before pressing the shutter, I realized that the prominent diagonals (mud on my car), minimalistic subject matter, and a central divider would give this photo a “pop art” feel to it.
When I make photographs like this I know they will not be popular on my flickr page where “in your face” wildlife shots get me the most views. While I recognize that wildlife is still my bread and butter subject matter with my audience, I do my best to diversify at times without alienating my viewing audience.
Tamron 90mm VC macro lens, Canon EOS 7D DSLR, Manfrotto 190xProB tripod with 489rc2 Ballhead, F/22, ISO 100, 1.6s exposure, Aperture-priority mode, One-shot Auto-focus Mode near center of photo, 2 second timer, Mirror Lock-Up, RAW file format
Lies brand t-shirt photoshoot

Dave Blinders Strobes, Camera, and Lens
I did a quick inpromptu photoshoot last night in Northern New Jersey for my friend Joe who runs his own small skateboarding T-shirt business in his spare time. Knowing in advance that I’d be working in close confines, I thought one Alien Bees AB800 Strobe with a stripbox style box, a Canon 580exII with Opteka grid, my Canon 60D dslr, and Tamron 18-270mm VC lens would allow me plenty of diversity and lighting and composing options.

Joe in rim lighting
Tamron 18-270mm VC, Canon 60D, and gridded 580ExII off-camera to subject’s left

Korynne and Carmela holding skateboard deck
Tamron 18-270mm, Canon 60D, and AB800 w/ stripbox angled slightly from camera right

Joe wearing his own branded T-shirt
Tamron 18-270mm Lens, Canon 60D, Gridded Canon 580exII Speedlight angled from slightly above subject

Korynne in navy blue Lies T-shirt
Tamron 18-270mm VC, Canon 60D, AB800 strobe slightly above and right of subject

Joe wearing one of his designs in white
Tamron 18-270mm VC Lens, Canon 60D, Gridded 580exII Speedlight aimed towards subject’s chest, AB800 on minimum power from subject’s right

Carmela wearing black Lies t-shirt
Tamron 18-270mm Lens, Canon 60D, AB800 in stripbox slightly above and right of subject

Korynne wearing blue Lies tank top
Tamron 18-270mm VC Lens, Canon 60D, 580exII Speedlight w/ Opteka Grid coming in from camera left
If you have any questions about the equipment, techniques, clothing line, or contacting the models please leave your information in the comments section or contact me via facebook.
Self-Critique on a photo I took today

From a VERY quick walk in this frigid weather.
Instinctively, I critique all of my photos on a technical and compositional basis when I review them.
Sometimes I notice things I couldn’t see through the viewfinder. In this particular shot, the small brown blur towards to the top left is an “error” in my opinion. It’s probably a distant dead leaf, and I feel it detracts a bit from the photo.
I would have removed it physically if I had noticed through the viewfinder. However, I do not like to alter my nature shots in post-processing, and I prefer not to crop. I do my best to present the scene as it was. I did though, move the feather from a pricker bush on the ground, to an elevated and isolated branch to make the shot. It blew away seconds later and I’m lucky I got a shot at all.
I did shoot a few frames at an aperture of F/4 also (presented shot is F/2.8). The increased aperture brought nice detail into the feather, however I did not like the background elements that starting coming into focus.
